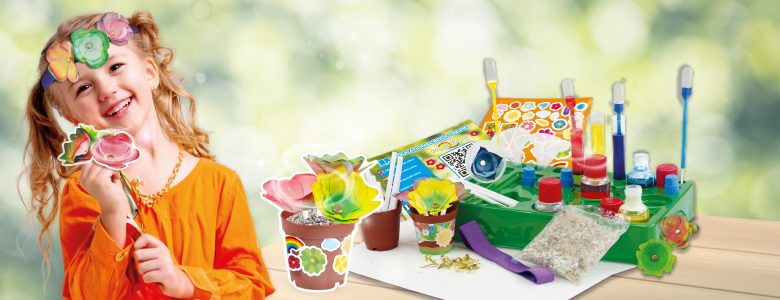
Creating paper flowers is an activity that can be a lot of fun for both children and adults. As well as being a great way to pass the time, it can also serve as a creative way to decorate the house or give a gift to someone special. In this article, we’ll explain how to make colorful and fragrant paper flowers in a simple way, using Science4you’s Paper Flowers Lab kit.
Materials needed
To begin our adventure in the world of paper flowers, we’ll need some basic materials. Fortunately, Science4you’s Paper Flowers Lab kit comes with practically everything you need:
- Filter paper with detachable flowers
- Ataches
- Filters
- Pasteur pipettes
- Funnel
- Test tubes with lids
- Scissors
- Water
- Peach scented base
- Blue, red and yellow coloring
- Laboratory bench
With all these materials at your disposal, let’s start creating our flowers!
1. Assembling the flower
Start by carefully detaching three paper flowers of different sizes, if necessary with the help of an adult. Once you have the three flowers, line them up and insert the lace into the hole in the center. Then mount the flower on the filter, inserting the lace inside. Pass the tube through the funnel until the flower fits into the large opening of the funnel.
2. Coloring and perfuming the flower
Now that we have the flower assembled, it’s time to give it some color. Here are two different ways to color your flower: chromatography (top-down method) and capillarity (bottom-up method).
Let’s start with chromatography!
Start by placing the test tube on the laboratory bench. Choose the color you want to make and prepare the mixture in the test tube. As the kit includes the primary colors, you can mix them and get new colors, it’s just a matter of testing. In total, you should have 15 drops of dye in the test tube. Now add 1ml of water to the test tube – the equivalent of a full Pasteur pipette. Put the cap on the test tube and shake it. Place the test tube back on the lab bench and remove the cap. Take the paper flower in one hand and hold the pipette with the other, pick up some dye and pour it onto the petals. For a more creative result, use several colors to color the flower. To make the colors diffuse, add a few drops of water on top. Finally, add 1 to 5 drops of fragrant peach base to the filter paper.
Watch the video of the first experiment.
To color the flower using the capillary method, you need to follow these steps.
Place the test tubes (without lids) with the dye on the laboratory bench. For this experiment, the water you add to the dye should preferably be hot. Pour 3 to 5 drops of water onto a paper flower already mounted in the funnel. Then insert the filter into the test tube with the dye. If you want to make a single-colored flower, let the ink rise through the filter, remove it from the tube and place it in a glass of hot water for a few hours. You can perfume it by putting 1 to 5 drops of peach perfume base on the petals while they are still damp. If you want to make a two-colored flower, when the paint has risen through the filter and is halfway through, immediately transfer the flower to a test tube with paint of a different color and wait about 15 minutes before placing it in the beaker of hot water.
3. Drying and decorating
This is probably the simplest step.
Let the flower dry for about 24 hours. If you’re not willing to wait that long, you can always cheat a little and use a hairdryer to speed up the process.
Inside the Paper Flowers Lab you’ll find vases, gravel to put inside the vases and stickers to decorate them. Then you can cut the filter in half and place it inside the vase.
The kit also contains a ribbon to make a wreath. All you have to do is take a flower, separate the lace from the filter, pierce the ribbon with the lace and open the ends of the lace to make sure the flower is attached to the ribbon. You can put as many flowers on the ribbon as you like!
The Paper Flowers Lab used to make these paper flowers is available on Amazon.